Time needed: 5 minutes
Re-skinning a monster is an easy way to create a monster that is a custom-fit for the story of your D&D game. It’s also a good way to reuse creatures already have without making your players feel like the fight is a rerun. The D&D 5e System in foundry comes preloaded with the monsters from the current Basic Rules, so that gives you a nice chunk of creatures to work with.
- Import the Creature You Want to Re-Skin
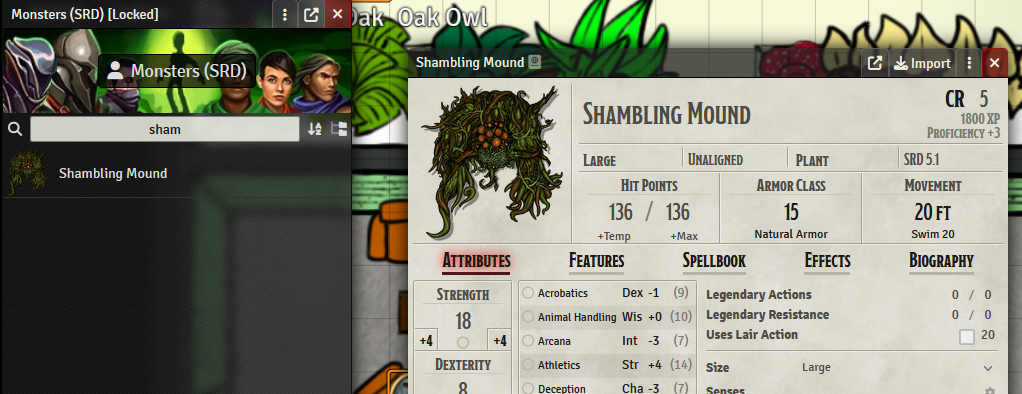
Open the compendium. Find the creature you want to reskin and click the “Import” button on in the upper right-hand corner of the window.

- Open the Character Sheet
Select find the creature in your Actor Directory. Double click to open the sheet. This will give you access to the prototype token, which you’ll need to make many of the changes.
- Change the Name
Change the name at the top of the character sheet. This will only change the name of the create on the character sheet and in the Actor Directory.
- Change the Art
Click on the current image to open the Image Browser. Drag and drop your new art into the list. Click the “Select File” button at the bottom of the window.
- Open the Prototype Token
Double click on “Prototype Token” in the upper right-hand corner of the character sheet.

- Change the Name on the Token
The first field on the “Identity” tab is Token Name. Changing the name here will change it on the token, in the combat tracker, and in posts to the chat.

- Change the Token Art
Next, move to the “Appearance” tab. Click on the icon to the right of the “Image Path” field at the top of the window. This will open the “Image or Video Browser” window. Drag and drop the image for your token into the list, and click the “Select File” button at the bottom of the window.
Need that art from above converted into a nice looking token? Check out my article on token makers.
- Update the Feature Descriptions
All or most of the creature’s features will have the creature’s name in their descriptions. These descriptions post to the chat when you use them. You’ll need to go through and edit them to completely erase the identity of the old creature. Click over to the “Feature” tab on the character sheet.

- Click on the Pen and Paper Icon to Edit the Feature
Click the Pen and Paper Icon at the far right of the feature, next to the trash can.

- Hover the text and click the Pen and Paper Icon That Appears

- Edit Any Mentions of the Creature Name
These edits save automatically. Just close the window when you’re done.

You’ve done it! You’ve erased all indications of these creature’s previous identity! If you want, you can change things up even more by dragging features into this character sheet from other character sheets. Here’s some monsters that might have features of interest.
0 Comments